Gamepad sample source code
| Sample page |
| <html> | |
| <head> | |
| <title>Axis Engine Gamepad Sample</title> | |
| <script type="text/javascript" src="https://www.palitri.com/vault/axis/engine/web/current/AxisEngine-min.js"></script> | |
| <script type="text/javascript"> | |
| // Gets called when the page has finished loading | |
| function Initialize() { | |
| var robotOrientation = 0.0; | |
| var actorTransform = null; | |
| var armTransform = null; | |
| var objectTransform = null; | |
| var actorAnimation = null; | |
| var lastFrameValue = 0.0; | |
| // Create an object to handle the HTML canvas with id='viewport' | |
| var viewport = new AxAnimationElement("viewport"); | |
| // Create the axis engine object, ready to render onto the canvas | |
| var axis = new Axis(viewport.canvas); | |
| var controlLeft = axis.input.GetInputControls("Key Arrow left,Key A"); | |
| var controlRight = axis.input.GetInputControls("Key Arrow right,Key D,Pad Analog X left"); | |
| var controlForward = axis.input.GetInputControls("Key Arrow up,Key W,Pad Analog Y left"); | |
| var controlBackward = axis.input.GetInputControls("Key Arrow down,Key S"); | |
| var controlActionUp = axis.input.GetInputControls("Mouse Right,Pad B,Pad Analog Y right"); | |
| var controlActionDown = axis.input.GetInputControls("Mouse Left,Pad A"); | |
| var controlRotateArm = axis.input.GetInputControls("Mouse X,Pad Analog X right"); | |
| // Set the OnRender method, which gets called continuously by the AxAnimation element | |
| viewport.OnRender = function () { | |
| axis.RenderScene(); | |
| if (!AxUtils.IsUndefinedOrNull(actorTransform)) | |
| { | |
| var moveVector = new AxVector3(); | |
| moveVector.Set(controlForward.GetValue(axis.timer.time) - controlBackward.GetValue(axis.timer.time), 0.0, 0.0); | |
| actorTransform.TranslateIntrinsic(moveVector.Scale(300.0)); | |
| robotOrientation += (controlLeft.GetValue(axis.timer.time) - controlRight.GetValue(axis.timer.time)) * 2.0; | |
| if (axis.PickByRayPointAndOrientation( | |
| actorTransform.GetPositionExtrinsic().Add(new AxVector3(0.0, 10.0, 0.0)), | |
| new AxVector3(0.0, -1.0, 0.0))) | |
| { | |
| actorTransform.SetPositionExtrinsic(axis.rayIntersectionEvents.intersectionInfo.point.position); | |
| actorTransform.SetRotationExtrinsic(new AxVector3(0.0, 0.0, 0.0)); | |
| actorTransform.RotateExtrinsic(new AxVector3(0.0, robotOrientation, 0.0)); | |
| actorTransform.RotateExtrinsic(new AxVector3(axis.rayIntersectionEvents.intersectionInfo.point.normal.z, 0.0, 0.0)); | |
| actorTransform.RotateExtrinsic(new AxVector3(0.0, 0.0, -axis.rayIntersectionEvents.intersectionInfo.point.normal.x)); | |
| } | |
| } | |
| if (actorAnimation !== null) | |
| actorAnimation.GetProperty("Speed").SetFloat((controlActionDown.GetValue(1.0) - controlActionUp.GetValue(1.0)) * 30.0); | |
| if (armTransform !== null) | |
| armTransform.GetProperty("Rotate Y").SetFloat( | |
| armTransform.GetProperty("Rotate Y").GetFloat() + | |
| controlRotateArm.GetValue(axis.timer.time) * 4.0); | |
| var pickFrame = 90; | |
| var currentFrameValue = actorAnimation.parameter.GetFloat(); | |
| var lastFrameDelta = lastFrameValue - pickFrame; | |
| var currentFrameDelta = currentFrameValue - pickFrame; | |
| lastFrameValue = currentFrameValue; | |
| // Picked objectd up | |
| if ((lastFrameDelta < 0.0) && (currentFrameDelta > 0.0)) | |
| { | |
| var movedObjectTransform = axis.FindResource("MovedObject", AxResourceType.Transform); | |
| var robotHeadTransform = axis.FindResource("RobotHead", AxResourceType.Transform); | |
| var d = movedObjectTransform.GetPositionExtrinsic().DistanceTo(robotHeadTransform.GetPositionExtrinsic()); | |
| var maxPickDistance = 2.3; | |
| if (d < maxPickDistance) | |
| { | |
| movedObjectTransform.SetPositionExtrinsic(robotHeadTransform.GetPositionExtrinsic().Subtract(new AxVector3(0.0, 2.0, 0.0))); | |
| axis.Attach( | |
| axis.FindResource("Terrain", AxResourceType.EntitySet), 5, | |
| axis.FindResource("RobotHead", AxResourceType.EntitySet), 3, robotHeadTransform); | |
| } | |
| } | |
| // Drop object down | |
| else if ((lastFrameDelta > 0.0) && (currentFrameDelta < 0.0)) | |
| { | |
| axis.Attach( | |
| axis.FindResource("RobotHead", AxResourceType.EntitySet), 3, | |
| axis.FindResource("Terrain", AxResourceType.EntitySet), 5, axis.FindResource("Terrain", AxResourceType.Transform)); | |
| } | |
| }; | |
| // Import a scene and when loading is done, start rendering | |
| axis.ImportScene("Gamepad.axs", | |
| function() { | |
| actorTransform = axis.FindResource("Robot", AxResourceType.Transform); | |
| armTransform = axis.FindResource("Robot arm", AxResourceType.Transform); | |
| objectTransform = axis.FindResource("Object001", AxResourceType.Transform); | |
| actorAnimation = axis.FindResource("Robot frame", AxResourceType.Mechanism); | |
| viewport.StartRendering(); | |
| } | |
| ); | |
| } | |
| </script> | |
| </head> | |
| <body onload="Initialize();" style="margin:0;"> | |
| <canvas id="viewport" style="width:100%; height:100%;"></canvas> | |
| </body> | |
| </html> |
| Html |
This example consists of a single canvas element inside of the body of the page.
The body element has its onload event set to call the Initialize() method and the canvas element has its id set to viewport so that it can be identified by Axis and used for rendering.
| JavaScript |
The whole setup of the 3d scene and rendering is performed in the Initialize() method.
A viewport object for utilizing the HTML canvas element and an axis object which is an instance of the engine are created
The OnRender() method of the viewport object is continuously called each frame.
Inside this method, rendering is performed, along with any scene-specific routines, in this case - controlling the robot, picking and dropping the object.
A moveVector variable denotes the momentary change in position for the robot. Since the robot moves only forward and backward along its orientation, only the X axis is set according to the inputs which control the forward and backward movement.
In this case, the robot's forward orientation is along the X axis, however in general, this depends on how the scene is built in Axis Editor. For example, the default "Forward" direction in Axis is Z.
The robotOrientation variable holds the azimuth orientation of the robot. This variable is kept, so that it can be combined with the rotations needed to correctly place the robot according to the terrain's relief.
Next, a very simple collision detection is applied. The PickByRayPointAndOrientation() method calculates information for the point of intersection between a ray and the scene. The ray's starting point is taken 10.0 units above the robot's location and the orientation is a fixed downward vector.
The position of the robot's transform is then set to match the intersection point, the terrain relief and the robotOrientation variable. To calculate how the robot is rotated according to the relief, we use the normal vector of the surface at the intersection point.
Note that even though this approach is simple, it may be computationally heavy for scenes of more complex geometry.
The actorAnimation variable references an AxMechanism entity from the scene, which controls the animation of the robot arm picking an object.
This animation was made in the modeling software where the model was created and here we only manipulate the speed at which it is performed.
For moving the arm down to pick the object up, the speed is positive. For dropping the object down and moving the arm up again, the speed is negative, so that the animation is reversed. When idle, the speed is zero.
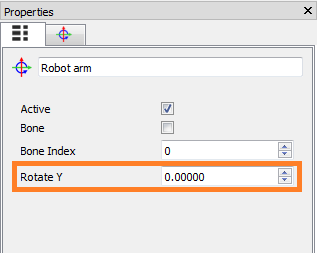
The armTransform variable references an AxTransform entity from the scene, which we use to rotate the whole arm around its base joint.
In this case, there is no predefined animation, but we simply take the transform for the arm's base joint and manipulate it. Usually each visual element in Axis has its transform, which defines its spatial properties like position and orientation.
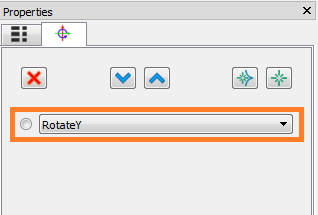
There is one thing preset though and this is the Rotate Y property, which we set in order to rotate the arm. This property is created in Axis Editor and by adding a "RotateY" item to the transform's operations list and it controls the rotation around the Y axis.
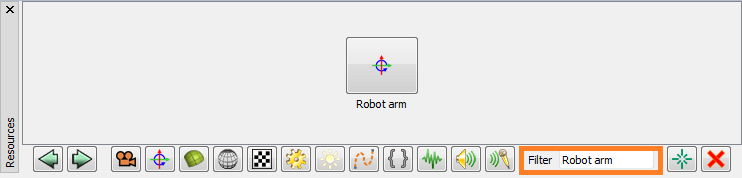
You can see how the transform looks in Axis Editor if you open the "Gamepad.axs" scene. To the transform easier, write "Robot arm" in the Resources panel's "Filter" field.
In the next few lines, the picking and dropping of the object is performed.
The frame of the robot arm's animation, at which the picking seems best to occur is around 90, so we check if the animation has just passed this frame and whether the animation is running forward or backwards, we respectively do the picking or dropping of the object.
To make picking easier, we have a threshold for the distance between the object and the robot's hand at the moment of picking.
For picking, we check if the robot's hand is close enough to the picked object and if so, the object's position is aligned precisely and attached to the robot's hand.
For dropping, we simply attach the object to the terrain again.